
Over the years I have had facial treatments a number of times with treatments ranging from fresh fruit facial to Gold facial. A good facial costed about INR 2000 (25 GBP) and was well worth it. The common steps of a facial routine are –Cleansing, Exfoliation, Steam, Massage and Face Pack.
There are pre-set facial kits that could be used for a particualr facial. A facial could also be custom made. For instance most aroma facials are – the oils to be used on client are chosen specific to the client skin type and concerns. Today I want to jot down do’s and dont’s of a spa facial from my experience.
Cleanse - Most spas store their cleansers in fridge to give that relaxing feeling on the first touch of cleanser.
DONT worry if cream cleansers are used, even on oily skin. Next step will balance it.
DO
1) Notice if the aesthetician is massaging the cleanser. It is just needed to smooth over the face for surface cleansing, not absorbed into the skin.
2) Leave the cleanser on the skin for few mins and removed with cotton wool before the next step.
Scrub – After cleansing, exfoliation is the next step. The type of scrub used would ofcourse depend on the type of facial. I have had facials where scrubs were very fine to huge chunks.
DON’T be afraid if rough chunky scrub is used, once in a while as part of the facial regime.
DO –
1) Let the exfoliation step last around 5 mins ( but not more)
2) Take care that the massage is not hurting your skin
3) Make sure to pay attention to your problem areas like corner of the nose
Steam - After the scrub is cleaned, steam is given to the face. This is not a mandatory step for all facial recipes but is done in most.
DON’T worry if the steam is left on different times for different people. Generally oily skinned people steam is given for more amount of time, about 5 mins.
DO
1) The eyes should be covered from steam with wet cotton before giving it
2) Black/white head removal is best to happen at this stage
3) Steam should be always followed cold compression to close the pores before the massage.
Massage - Facial massage is the best part of the facial and THE step that makes it different to at-home facial. A good massage is not only nurturing but relaxing as well. This phase should be of about 15-20 mins.
DON’T
1) An ideal massage would be from hands which are naturally warm and soft.. do not have grooves on them. Not everybody is eligible to give a massage. J
2) Don’t let the cream clog your pores. This happens if previous steps aren’t done properly.
DO
1) Choose the right thing for you – it is ideal to use a gel or mild cream for oily skin and good cream for others. Good facial kit would provide this choice.
3) Good amount of cream/gel is used (about 15-20 gm) and is absorbed well into the skin over the massage.
4) Leave the skin for 2 mins to let it absorb before cleaning up any extra cream.
Face Pack -The final step of a facial is the face pack. Although we use them at home more so often, nothing can match the one which is part of facial.
DON’T
1) Let your skin be left and forgotten with the face pack on. No pack needs to be dry more than 85% in actual (except some thermo packs).
2) Speak and go around with pack on. Sit back and feel it working.
DO
1) Let the eyes be covered with cotton pads dipped in cucumber/rose water or some eye pads.
2) Check and confirm that the pack balances rest of the facial. For example if you have oily skin and a cream was used for massage, the pack would be clay-based to draw out any excess oils the cream has left on the skin.
Pre-facial
Selecting the facial right for your skin is the most important step. It is based not just on your skin type (oily, dry ) but also skin needs at the moment (like nourishing, deep clean). Generally the aesthetician should assist and advice in this regard. Do mention any known allergies to help the decision.
Wrong decisions could be like –
An ‘orange peel facial’ disturbed my friend’s skin and caused eruptions because she was allergic to citrus things.
The famous ‘gold facial’ that works wonders and is used by almost every bride made me more oily and break-out because of the cream. A gel with gold oxide worked perfect the next time I had this facial.
Post-facial
Sometimes the skin might produce more oil after a facial routine than it usually does. Do not panic; it could be the skin’s way of adjusting to that particular facial and should settle in 24 hours. Pay attention if it continues.
After a facial it is important to stay away from make-up and any other treatments. It is advised use a mild cleanser and good moisturiser. Any treatments like facial hair removal, facial bleach should be performed before the facial routine.
A gap of 4 to 6 weeks can be left between two professional facial routines. Just like many treatments, a facial every other day would not do any miracles.
Ok I am really pepped up for an at-home pore refining facial and let me show you my facial kit I would be using this time:
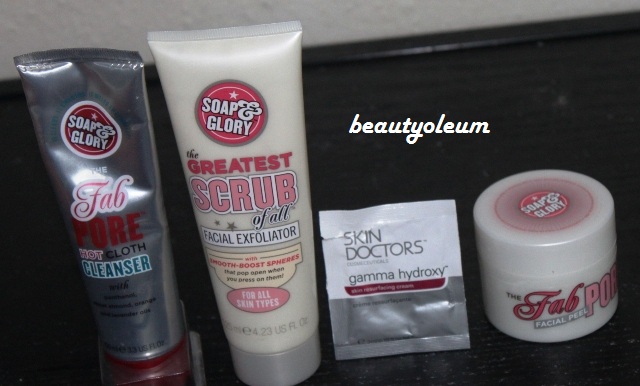
Soap & Glory The Greatest Scrub
SKIN DOCTORS gamma hydroxy resurfacing cream
Soap & Glory The Fab Pore Peel
Hope this post helps you people and do let me know your facial treatment experiences J
1 comment:
This is a great post :)
I'm currently having a mini giveaway on my blog http://purelybeauty.blogspot.co.uk/ :) x x x
Post a Comment
Hi... Thank you for leaving a comment... I treat my blog post as what I am speaking to you and I am extremely glad you replied... :)